|
|
Introduction |
The appearance of characters is dependent on their character attributes. The most common character attributes are font, type style and size.
To apply character attributes to a block of text, simply select the text and then set the character attributes. To apply character attributes to the next text you type, place the insertion point, set the character attributes and then type.
![]()
To change one character attribute for selected text: Select
the text to change with the Text tool. Choose the appropriate
Type menu command or select its equivalent from the Character
view of the Edit palette.
To change multiple character attributes at once for selected text: Select the text to change with the Text tool. Choose Attributes from the Type menu. Change the text attributes and click OK.
If you want to change the character attributes of many small blocks of text, you should consider using character styles to save time.
To change character attributes for all text formatted with a character style: Hold down Shift while choosing a style from the Character Styles submenu in the Type menu to display the Character Style dialog box. Modify the attributes and click OK. All text formatted with that style will change automatically.
The Font submenu allows you to select an installed font to apply to text.
Note: Because AmigaOS does not support scrolling menus, and the amount of fonts installed on a computer system can easily exceed the screen space available to display all of them, a requester is provided for Amiga users to select a font from the Type menu. Choose the Font item to open it.
The Size submenu allows you to select a preset or custom type size. You can set type at sizes up to 79,200pt. The Width submenu allows you to scale text horizontally from 1 to 650% in .01% increments. Changing the width by more than a small amount can distort the character designs.
The Type Style submenu lets you choose designed and applied type styles. Designed styles are separate font files. For example, Times Italic is a designed style of the Times family. If you select Italic when Times Roman (Normal) is set, Times Italic will be used if available. The selected font will still be Times, but PageStream will use the Times Italic font to display the text. If Times Italic is not available, PageStream will italicize the normal style by slanting the font slightly.
All of the Type Style commands except Normal and Bold will open a dialog box if you hold down a Shift key so that you can configure them. For example, the Superscript dialog box allows you to set the scale and offset for the superscript text.
Choose Set Type Style from the Type Style submenu to display the Type Style dialog box. The Browse buttons allow you to customize styles. Alternatively, you can hold down a Shift key while clicking on a style button of the Edit Palette to customize directly the type style.
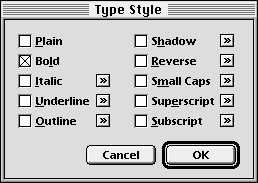
The Browse Button
The Line & Fill command displays a dialog box to set text line, fill and color attributes. It is identical to the Object menu Line & Fill command for object attributes. Refer to the Line, Fill & Color chapter for more information.
Tracking adjusts the space to the right of each character. Increasing the tracking increases the amount of space between all text, regardless of its character and word spacing, and thus brightens a page. Decreasing the tracking reduces the space between all text and darkens a page.
![]()
PageStream offers five predefined tracking tables ranging from Very Loose to Very Tight. The tracking amount when you apply a tracking table depends on the type size; large sizes are tracked more tightly than small sizes. For example, the Normal track adds 0.01 ems between characters at 8 points and removes 0.02 ems at 24 points. No space is added or removed at 12 points. One em is equal to the size of the text, so adding 0.01 ems to 8 point type adds 0.08 points of space.
Select None to avoid using a preset tracking table. You can enter a custom tracking value if desired, and even use both a preset track and a custom value.
To change the tracking: Choose Tracking from the Type menu to display the Tracking dialog box, or use the Character view of the Edit palette. Select a preset track from the Set Tracking pop-up menu. Enter a custom track amount in 1/100ths of an em.
You can also adjust tracking with keyboard shortcuts for selected text. If text is not selected, the characters at the insertion point will be manually kerned.
Note: Amiga and Windows users should hold down the Alt key for the Option key.
Last Line Flush Zone: Enter the width of the justification zone for the last line of text in a paragraph. If the line ends within this zone, it will be force justified. Use this option with care because this can add an extreme amount of space between characters and words.
While PageStream's default tracking tables will correctly adjust text spacing for most fonts, some may require custom tracking tables.
![]()
To adjust a tracking table for a font: Choose Tracking Tables from the Define submenu in the Edit menu. The Define Tracking dialog box will appear. Choose the font from the Font pop-up menu. Choose the table to edit from the Table pop-up menu. The tracking points for that font's tracking table will be displayed in the Range list box. Each point in the tracking table defines the track amount at that text size. Text size between tracking points will have a proportional track amount assigned to it. Any text size greater than the last tracking point's size will have the same tracking amount as the last tracking point.
To change the size or track for a tracking point: Choose the tracking point from the Range list box. Enter the new values in the Size and Track text box. The tracking points in the Range list box will be sorted based on the new size value. Note: The first tracking point will always have a size of 0pt, and the size can not be changed, and the point can not be deleted.
To add a tracking point: Click the Add button. Enter the values in the Size and Track text box. The tracking points in the Range list box will be sorted based on the new size value.
To remove a tracking point: Choose the tracking point from the Range list box. Click the Remove button.
To reset the the tracking points: Click the Default button. Note: Only the selected tracking table for the selected font will be reset to the default values.
Character spacing allows you to adjust the space surrounding each character. Each character in a font is designed with a certain amount of space around it. You can increase or decrease this space with character spacing.
Word spacing allows you to adjust the space surrounding each word. The space character in each font determines the size of the space between words. You can increase or decrease this space with word spacing.
PageStream allows you to specify minimum, optimum and maximum values for character and word spacing. If your text is unjustified (blocked left, right or centered), the only values which apply are the optimum values. Zero percent optimum character spacing uses the font's designed spacing. Positive values increase the space around the characters and negative values decrease the space. 100% optimum word spacing uses the font's designed width for the space character. Larger values increase the size of the space and smaller values decrease the space.
If your text is justified, PageStream will attempt to space characters and words to match the optimum values. It will be unable to match the optimum value and will have to add or remove small amounts of space.
You can set the minimum and maximum amount of space that PageStream can add or remove between characters and words in justified text. PageStream never spaces characters or words closer than the minimum values, but it may exceed the maximum values if there is no other way to justify the text.
To set character spacing: Choose Tracking from the Type menu to display the Tracking dialog box. Enter the minimum, optimum and maximum character spacing values. You cannot enter a minimum of less than 300% or a maximum greater than 300%. The minimum must be less than or equal to the optimum, which must be less than or equal to the maximum.
To set word spacing: Choose Tracking from the Type menu to display the Tracking dialog box. Enter the minimum, optimum and maximum word spacing values. You cannot enter a minimum of less than 0% or a maximum of greater than 650%, and the minimum must be less than or equal to the optimum, which must be less than or equal to the maximum.
Kerning adjusts the space between all occurrences of specific character pairs. Certain characters look better when spaced more closely. PageStream can automatically remove space between characters as you enter text.
Ligatures are combinations of two or three characters which are used to improve their appearance because they usually do not look good together. This applies particularly to the fi and fl combinations in body text. When typing these characters successively, PageStream can automatically insert the corresponding ligature, but it will not actually replace it in the text, so you can edit, spell check and search the text as if the ligatures were individual characters.
Kerning information is built into fonts. Most fonts have kerning values for a standard list of character pairs. Higher quality body fonts may have hundreds of kerning pairs, while display fonts may lack kerning pairs altogether. Ligatures require the proper ligature characters to be present into the font.
You should normally use automatic kerning for body text above 8 points. At smaller sizes and low resolutions, the effects of kerning won't be as noticeable and the small speed loss due to kerning will be pointless.
To automatically kern text: Select Auto Kerning from the Kerning submenu in the Type menu.
PageStream allows you to set a threshold above which text is kerned. This allows you to leave automatic kerning on for most text without needlessly kerning very small text.
To change the threshold above which text is kerned: Choose Set Kerning from the Kerning submenu in the Type menu to display the Auto Kerning dialog box. Enter a new threshold into the Kern Above text box.
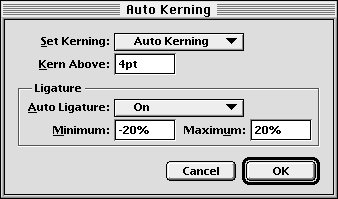
To automatically substitute ligatures as you type: Choose Set Kerning from the Kerning submenu in the Type menu to display the Auto Kerning dialog box. Select "On" from the Auto Ligature pop-up menu. To prevent "ffi" and "ffl" from getting combined into ligatures, choose the "On (No ffi ffl)" option.
To configure the Auto Ligature option: Enter the minimum and maximum tracking values between which characters should be combined into ligatures. Using ligatures with loose or very tight tracking will make them appear poorly tracked.
Many commercial fonts, and most shareware or public domain fonts, have limited or no kerning pairs defined. With PageStream, it is possible to improve upon the predefined kerning pairs.
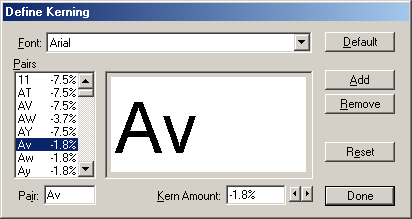
To modify the kerning pairs for a font: Choose Kerning Pairs from the Define submenu in the Edit menu. The Define Kerning dialog box will appear. Choose the font from the Font pop-up menu. The kerning pairs for that font will be displayed in the Pairs list box. Each kerning pair entry defines the kern amount for that pair of characters in that font. A negative kerning value will bring the two characters closer together, and a positive value will push them apart.
To change the kerning amount for a kerning pair: Choose the kerning pair from the Pairs list box. Enter the new value in the Kern Amount text box or use the left and right arrows to bring the pair closer or further apart. The visual display box will update to show a sample of the new kerning amount.
To add a kerning pair: Click the Add button. Enter the two characters in the Pair text box. Enter the kerning value in the Kern Amount text box.
To remove a kerning pair: Choose the kerning pair from the Pairs list box. Click the Remove button.
To restore a single kerning pair's default value: Choose the kerning pair from the Pairs list box. Click the Reset button.
To restore the font's entire default kerning pairs: Click the Default button. Note: Only the selected font will be reset to the default values.
You may want to manually kern headlines or other large type. The kerning pairs built into most fonts are designed for use at body type sizes. If you use large type you may have to manually kern the characters to achieve optimum character spacing.
Manual kerning will kern only the characters on either side of the insertion point. Kerning is measured as a percentage of an em.
To manually kern a character pair: Place the insertion point between two characters. Choose Manual Kern from the Type menu to display the Manual Kern dialog box. Enter a new kern amount or nudge the space with the arrow buttons. Click OK.
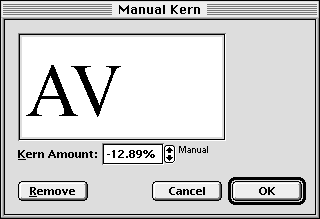
You can also kern characters with keyboard shortcuts. If text is selected it will be tracked rather than kerned.
Note: Amiga and Windows users should hold down the Alt key for the Option key.
To remove manual kerning: Select the Remove Kerning item from the Kerning submenu of the Type menu.
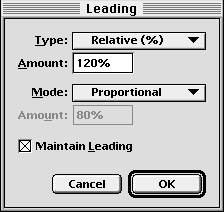
Leading is the space between lines of text. PageStream allows you to set the amount of leading, how leading is measured, and how lines are positioned. There are four ways to measure leading in PageStream:
In general, the amount of space added between each line of body type should be about 20% of the type size. If you use relative leading this would be 120%. You can apply leading to any amount of text, but PageStream uses the leading of the first character on each line. You should normally set leading for paragraphs instead of smaller blocks of text.
To set the leading amount and how it is measured: Choose Leading from the Type menu to display the Leading dialog box, or use the Character view of the Edit palette. Select how to measure leading from the Type pop-up menu. Enter the leading value into the Amount text box.
The horizontal bar in which a line of text is positioned is called a slug. It is the total of the text and its line spacing. The top of each slug is immediately below the slug above it.
There are four methods for positioning lines of text within their slugs:
- Proportional: The baseline of a line of text is 80% of the way down from the top of the slug. This is the default leading method.
- Baseline: The bottom of the slug is aligned with the baseline of the line of text. This is sometimes referred to as the typesetting method because it is the method used in traditional typography.
- Top-of-Caps: The highest point on any character in any font on the line is placed at the top of the slug. This is sometimes referred to as the word processing method because it is used by many word processors.
- Custom: This is a variation of the Proportional leading method, except you can set the baseline offset from the top of the slug.
Most people will not need to change the leading mode and can just use the Proportional default.
To change the leading mode: Choose Leading from the Type menu to display the Leading dialog box. Select a leading method from the Mode pop-up menu. For Custom leading, enter an amount in the text box below. Click OK.
The Convert Case submenu allows you to change the case of the selected text. It is not a real character attribute at this time, so you will have to change the case manually each time you want to do so.
To change the case of the selection: Choose Uppercase to change the selected text to all capital letters, choose Lowercase to change the selected text to all lowercase letters, and choose Capitalize to change the selected text so that only the first letter of each word selected begins with a capital letter.
Select from the Language submenu to choose from the installed languages and your page numbers, dates, times and hyphenation will change to reflect that language if you hadn't specified it in the aforementioned attributes. This attribute is also used for checking the spelling of the articles.
|